With the Posteo migration service, you can safely migrate up to 3 external email accounts including their folder structures to Posteo. You can also transfer your address book and your calendar from selected email providers. Your data is directly fetched by Posteo from your previous provider and is copied over encrypted connections to your Posteo account. At no point in time is your data transferred via a third party.
In this help article you will learn how to use the Posteo migration service and will receive tips for transferring your data.
Contents
- Copy emails
- Copy address book
- Copy your calendar
- Import multiple calendars
- Open copied emails
- Tips & troubleshooting
- Related help articles
How to copy your emails to Posteo
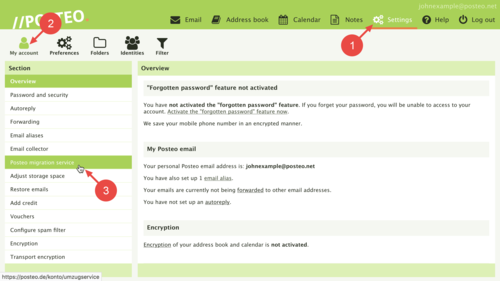
First, log in to Posteo. After logging in, follow these steps:
- Open the Settings.
- Click on .
- Open the menu item Posteo migration service.
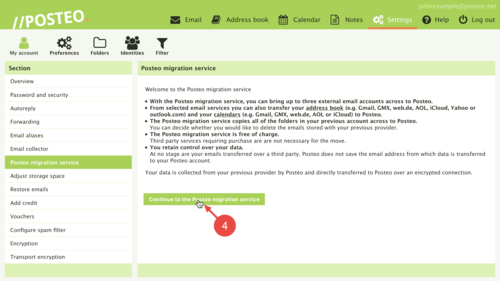
- Start the migration service by clicking on Continue to the Posteo migration service.
- Enter the email address and password (when applicable) of your existing email account.
Note: You can copy email accounts from all providers that allow access via IMAP. Migration via POP3 is not possible. - Click on Proceed to folder selection.
Are you having difficulty accessing your old email account? Certain issues that should be taken into account with specific providers can be found in the Tips & troubleshooting section.
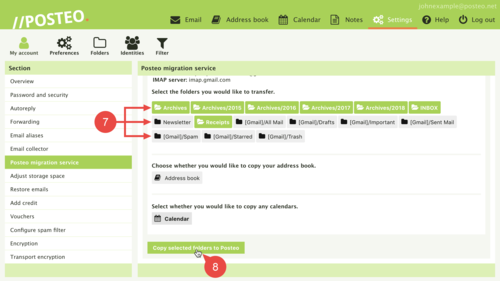
- Click on all folders that you would like to copy to Posteo.
Would you also like to import your address book and your calendar? Then click on the guide How to copy your address book to Posteo and continue there. If you only want to import your email archive to Posteo, initiate the transfer by continuing to step 8:
- Verify that you have selected all the folders you wish to import. Begin the import of your emails with Copy selected folders to Posteo.
That’s it! The Posteo migration service will now copy your existing email archive to your Posteo account. During the migration you can continue to use your account like before. You can learn how to open emails after the transfer is complete here.
Tip: You can also redirect incoming emails from your previous email accounts to Posteo. All new incoming emails will be fetched every 10 minutes by Posteo. You can learn how to activate the email collector for your existing email accounts in our help article How do I use the email collector?
How to copy your address book to Posteo
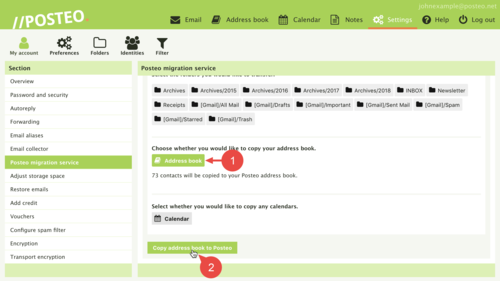
If it’s possible to import your address book from your previous provider, a button Address book will appear underneath the folder overview. Supported providers include Gmx, web.de, AOL, iCloud, Yahoo! and Outlook.com among others. To import your address book, follow these steps:
- Select the address book by clicking on Address book.
Would you also like to import your existing calendar? Then click on the guide How to copy your calendar to Posteo and continue there. If you do not want to import any calendars, start the migration by continuing to step 2:
- Click on Copy address book to Posteo. If you also selected emails to be imported then the button will be adjusted to read Copy emails and address book to Posteo.
How to copy your calendar to Posteo
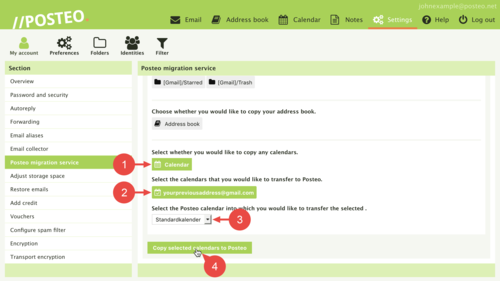
If it’s possible to import your calendar from your previous provider, an additional button will appear underneath the address book button Calendar. Supported providers include Gmx, web.de, AOL and iCloud among others. To import your calendar, follow these steps:
- Activate the calendar import by clicking on Calendar.
- Choose the calendar or calendars that you would like to import.
- Select a target calendar in your Posteo account such as the default calendar.
Note: The migration service copies all calendar entries into the target calendar. If you’d like to import multiple calendars, please see How to import multiple calendars below. - To complete the migration, click on Copy selected calendars to Posteo. If you also selected emails or your address book to be imported then the button will be adjusted to read copy emails and/or address book and calendar to Posteo.
Tip: Importing multiple calendars
Do you make use of multiple calendars and would like to retain your existing calendar structure when importing to Posteo? To create a separate copy of each of your calendars in your Posteo account, follow these steps:
- Create a new calendar in your Posteo account for each of your existing calendars.
You can learn how to set up additional calendars here. - Follow the instructions in the section How to copy your calendar to Posteo. Important: Always select only one calendar and one target calendar at a time.
- Repeat step 2 until all calendars have been copied into the desired calendar in your Posteo account.
Should you require additional imports when migrating your calendars, please contact support@posteo.de.
How to open copied emails
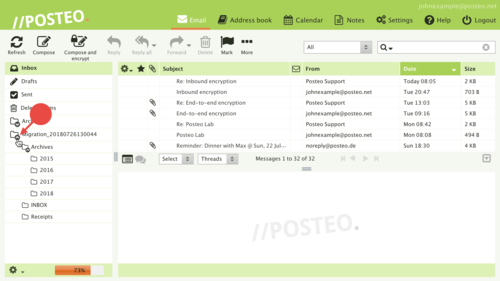
The Posteo migration service creates a new folder for your copied emails. The name of the folder consists of the word “Migration”, an underscore and the date of the import. The folder itself does not contain any emails. To open the transferred emails, follow these steps:
- Click on the arrow underneath the folder symbol to display the transferred folder.
- Click on the appropriate folder to display the emails.
Tip: You can move the folder to another location. You can learn how to do this in our help article How do I move a folder?.
Tips & troubleshooting
Privacy notice: In this section you will find links to help pages from external sources. It’s possible that they may have active tracking tools, cookies, etc.
Gmx: Enable access via IMAP
Access via IMAP is disabled for many Gmx accounts. If you would like to enable IMAP access for your migration, you can read more about it in the Gmx help section.
iCloud: Create app-specific passwords
A separate password is required for each program with iCloud. You can read about how to create an app-specific password for the Posteo migration service in Apple help.
T-Online: Create a password for email programs
To access a T-Online account via IMAP, you need to create a specific password. The password can be created in your account settings at T-Online. A guide for creating an email password can be found in T-Online’s help section (in German).
Web.de: Enable IMAP access
Access via IMAP is disabled for many web.de accounts. You can learn how to enable IMAP access for migration in the Web.de help section (in German).
Yahoo!: Enable IMAP access
Unlike in the past, Yahoo! blocks connections via IMAP by default now. You can enable encrypted access via an IMAP connection with the option allow apps that use less secure sign in. You can learn how to do this in this Yahoo! help article. Please don’t be confused by the wording “allow apps that use less secure sign in”. You are simply enabling normal access via IMAP with this option.

